Git for IT Professionals: Getting Started
 Ravikanth C
- 7 Min To Read
- 13 Jul, 2015
- Comments
In this series so far:
Part 1 – Git for IT Professionals: Getting Started (this article)
Part 2 – Git for IT Professionals: Working with Repositories
Part 3 – Git for IT Professionals: Life cycle of repository files
By now, you must have seen the announcement of moving DSC resource kit modules to GitHub and opening it for community contributions. So, if you are keen on contributing to this repository, the first thing you must know is, obviously, how to use GitHub. In this series of articles, I will introduce Git — a version control system that GitHub hosts — and help you learn different version control concepts. We will use Git CLI locally for all our examples but eventually show how you can create and work with remote repositories on GitHub. And, we will also see how to use build automation and continuous integration support with AppVeyor. So, by the end of this series, you will have a solid understanding of the Git concepts, GitHub usage, and how to perform build automation and continuous integration.
What is version control?
For an average IT professional, I was one a few years ago, version control is an alien concept. We never needed it and it was only a developer thing until recently. The recent focus on DevOps and infrastructure as code practices made version control a mandatory skill for IT professionals too. Infrastructure as code practice says that configuration of systems should be considered as code and that code must be version controlled, unit tested, and then deployed to relevant environment after continuous testing. Having version controlled configurations makes it easy to roll back to an earlier configuration, if and when needed. In essence, a version control system keeps track of changes to a file or set of files. And, these files don’t have to be script files. Version control can be applied to almost every type of file.
There are many different types of version control systems out there. Git is one of them. But, what makes Git so special and most popular?
The earlier version control systems (CVCS) were centralized. This includes VCS such as Subversion. CVCS means that there is a central server hosting the version control database which keeps the entire history of changes to files. Clients or developers check-out files from this central repository, make changes and check them in. The obvious issue here is the availability of the central server hosting version control database. If this server is down or the data hosted on this server gets corrupted, you are doomed!
The Distributed Version Control Systems (DVCS) solve the problem with CVCS. Git is one of them. When using DVCS, we don’t check-out files that we need. Instead, we clone an entire repository. Each repository in the distributed system keeps a local copy of all changes made and the history about all previous versions. This also makes it possible for developers to collaborate effectively. So, in case of corruption of a repository, it is much easier to re-create the same by using one of the client’s local cloned repository.
In this series of articles, we will focus our time and energy on Git. So, let’s jump into that right away.
History of Git
Now coming back to Git, it was started after a fight between the Linux Kernel community and the company that was providing version control services (BitKeeper) to them. Linus Torvalds, in 2005, started the development of their own distributed version control system and called it Git. Git was started with a goal to create a version control system that is very fast, simple to use, fully distributed, and, finally, handle small to large projects in the same way without any restrictions. Git, indeed, has met all those goals. Just imagine the scale of Linux kernel patch submissions that happen every day. Git scales really well and it is no wonder why it is the most popular version control system out there.
How does Git work?
Unlike the other version control systems that track and store a list of changes between different versions of files in the database, Git uses snapshots. A snapshot is a point in time copy of the data. Every time we save state of the repository or commit changes, Git generates a snapshot of the repository at that point in time and stores references to that snapshot in the version control database. We will see the benefits of this approach in a later part but for now understand that this is one of the core aspects of Git that places it well ahead of others in the DVCS space.
Getting started with Git
Before we get started, understand that Git is the underlying version control system for many providers such as GitHub. Understand that GitHub is a Git hosting service and not version control system itself. The GitHub client for Windows provides an easy to use GUI to work with version controlled repositories hosted locally or on GitHub. There are many other GUI clients that provide the capability similar to GitHub for Windows and help connect to a central Git server in your own organization. In this series of articles, at least in the first few parts, we will use only the Git command line interfaces (CLI) to work with Git repositories locally or remotely. This helps us understand the concepts well and makes it easy to transition to GUI when needed. Also, understand that the GUI clients provide only a subset of functionality available at the command line.
You can get Git command line when you install GitHub for Windows. However, we will use the Git download from git-scm.com. This is always ahead from the Git version that comes with any of the GUI clients.
Once you have downloaded the Git client setup file, you can install it silently using the command line parameters.
| |
After the install, on my Windows 8.1 system, I see three entries when I search for Git.
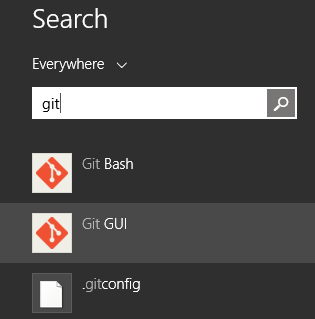
Git GUI is a minimal GUI client that provides a way to create new repository or open an existing repository or clone a repository. We won’t use this at all. Git Bash is the command console that we will use the most in this series of articles. This is where we will run all the Git commands to create and manage repositories. .gitconfig is related to the discussion that we will have now.
Configuring Git environment
One of the first things that we must do before we do anything with Git client is to tell Git our identity. This is done using the git config command. Run the following commands at the Git Bash console.
| |
This identity information gets used when you create repositories. Now, observe the command line. We have used the –global flag. This flag indicates that we want to update the .gitconfig file in the home directory of the current user. What if we want to apply this information to all users on this system? We need to use the –system flag instead of –global. And, what if we want to customize this identity information for a specific repository on the system? When you are inside the repository directory, run git config with no –global or –system flags. Think of these gitconfig files as the PowerShell profiles. There are available at various levels. So, which one takes precedence?
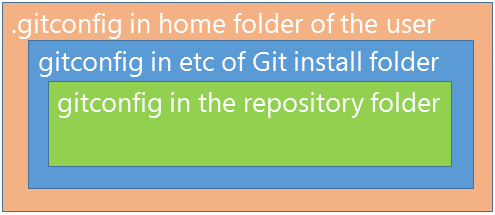
The inner-most layer in the above picture takes precedence over the outer layers. The Git config files are used to configure settings that impact the way you work with repositories. Therefore, it is important to understand this order of precedence. We can test this very easily! Run the following commands at the Git Bash console.
| |
We can see all the settings in the order of precedence by using git config –list command.
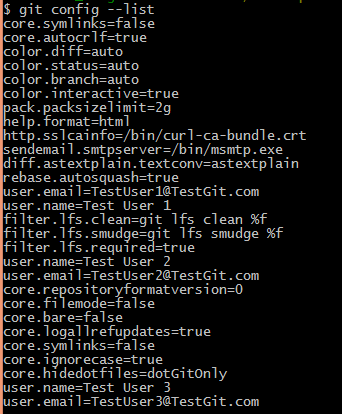
You can see in the above picture that the settings configure inside the Git repository appear at the end and therefore take precedence over the other levels of configuration. The git config command has several other options which we will learn throughout this entire series.
This is it for today! We will learn how to create and do some basic work with the Git repositories locally in the second part of this series. Stay tuned.
Share on: