Natively Query CSV Files using SQL Syntax in PowerShell
 Chrissy LeMaire
- 7 Min To Read
- 12 May, 2015
- Comments
Note: The previous version of this article relied on the 32-bit JET engine. It has been updated to use ACE, which works in both 64-bit and 32-bit environments.
Using Microsoft’s ACE provider, PowerShell can natively query CSV files using SQL syntax. This technique is particularly useful when processing large CSV files that could exhaust your workstation’s memory if processed using Import-Csv. For those of you already familiar with SQL syntax, it can also simplify queries. Consider the following pure PowerShell code vs. a SQL statement which produce the same results:
| |
Querying CSV files using SQL can be accomplished using either ODBC (OdbcConnection) or OLEDB (OleDbconnection). Below, we will explore querying CSV files with OLEDB.

Figure 1. Querying a CSV file using a formalized version of the scripting technique described in this article.
Getting Started
To query a CSV file using a SQL statement, we’ll follow these basic steps:
- Build the connection string
- Create and open a new OleDbconnection object
- Create a new OleDBCommand, and associate it with the OleDbconnection object
- Execute the SQL statement
- Load the results into a data table
- Clean up
Building the Connection String
In order to provide a working example, my top tracks from Last.FM in CSV format will be downloaded and saved to a temp directory. This CSV file, which contains over 1,300 rows, has four columns: Artist, Title, Rank, and Playcount,
| |
The default delimiter for an OleDb connection is a comma. Other delimiters include semicolons, tabs (`t), pipes (|), and fixed widths (FixedLength).
If you’re using any delimiter other than a comma, the schema.ini file must be used. Microsoft’s website suggests that FMT=Delimiter($delimiter) within the connection string works, but that has not been my experience. If you are using an alternative delimiter, use the following code to create a basic schema.ini file.
| |
If you’re using fixed width, check out Mow’s article on this topic for more information, since a lot more information is required within the schema.ini file.
The connection string for the OleDb connection is a little different from the more familiar SQL Server connection string. It requires a Data Source, which is the directory that the CSV file resides within. Since $csv contains this information already, we’ll parse it for that information using Split-Path. You must also specify whether the first row contains the headers. This is answered with a “Yes” or “No” by the $firstRowColumnNames variable. Note that if the first line of your CSV file does not contain the column names, OleDbconnection defaults to using F1, F2, F3, and so on for column/field names.
First, we will select the ACE provider. If more than one ACE provider version is returned, we’ll just use the first one. Then, we’ll use the resulting provider name within the connection string.
| |
Next, the table name, which is called within the actual SQL statement, is the CSV file’s name with the period replaced by a hashtag.
| |
Crafting the SQL Statement
First, we’ll create a mildly complex SQL statement that uses SELECT, SUM, WHERE, GROUP BY, HAVING, and ORDER BY. Note that the query is case-sensitive, so take special care when using the WHERE clause.
| |
Upon executing this query, I expect to see the top 20 artists that I’ve listened to, ranked by the number of times I’ve played their songs, but I should not see Fall Out Boy in my results, or any artists that I’ve listened to less than five times.
If you’re looking to test a simple SQL query, the following statement also works well:
| |
A good resource for learning more about the supported SQL syntax is Microsoft Access’ SQL reference page, since it’s the same engine. If you’re wondering if you can DELETE or UPDATE records within the CSV, the answer appears to be no. You can, however, manipulate the resulting data table output, and re-export to CSV, as seen in the section titled “Data subset and UPDATE example.”
Setting up the Connection and Executing the SQL statement
In order to execute the SQL statement, an OleDbconnection object must be created, opened and associated with a new OleDBCommand object. Once the OleDBCommand’s CommandText is set to the $sql variable, we will create a DataTable object and fill it with the results.
| |
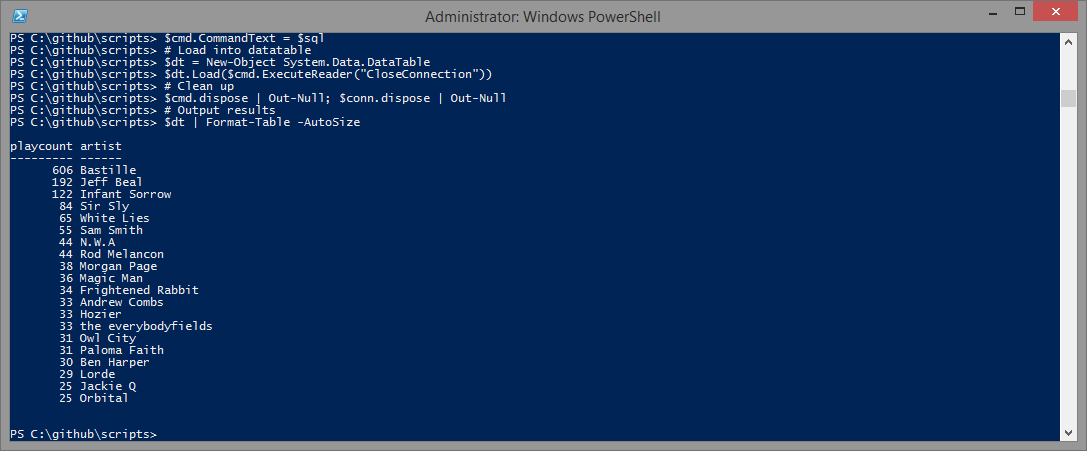
Figure 2. Script output
$cmd.ExecuteReader returns System.Data.Common.DbDataReader, and the easiest way to work with this in PowerShell is to place these results inside a DataTable. The CloseConnection behavior is passed to ensure that the OleDbconnection is closed once the DbDataReader object is closed.
Bringing it all together
To see the script in action, just copy and paste the code below:
| |
Data subset and UPDATE example
You can also grab subsets of data and then manipulate the data within the resulting datatable. Here’s how:
| |
Other Use Cases
This approach is especially useful when working with larger CSV files that would potentially exhaust a machine’s memory if Import-Csv were used. I have employed a similar technique to quickly find duplicates in large CSV files, and once identified over 9,000 duplicates within a million row CSV in only 6.4 seconds.
If your resulting datatable is a reasonable size, you can also use it in conjunction with SqlBulkCopy to efficiently populate SQL Server tables with subsets of CSV data. When uploading larger datasets, I recommend using a paged approach instead, in order to avoid memory exhaustion.
Invoke-CsvSqlcmd.ps1
You can find a formalized version of this technique within a script called Invoke-CsvSqlcmd.ps1, which is available on Microsoft Script Center. Invoke-CSVSQLcmd.ps1 features a seamless shell switch and straightforward delimiter support. The syntax has been simplified, making querying a CSV file as simple as:
| |
Check out Invoke-CsvSqlcmd.ps1 on Script Center for more information.
Conclusion
PowerShell can natively query CSV files using SQL syntax, which drastically increases performance when working with large files and complex queries.
Share on: