CompatAware: Scripting against different PowerShell versions
 Tobias Weltner
- 9 Min To Read
- 09 Apr, 2015
- Comments
You may remember “DLL Hell” from the old days. A very similar beast lives in our PowerShell ecosystem, too.
Take 5 different PowerShell versions, all with different supported cmdlets, language elements, and parameters, and blend this with hundreds of available modules – out comes a truly high-proof cocktail, and it becomes evident that it’s far from trivial to safely develop code for a given platform.
That’s simply life and the course of technical evolution, but there are ways to make this cocktail much more tolerable. ISESteroids has just added some safety gear for professional PowerShellers called CompatAware.
It is part of a series of assistance systems design to write better code in less time, and improving your PowerShell skills and knowledge while you code. After all, cars today have airbags and navigation systems, too.
Much of what is going to be presented here was inspired by the overwhelmingly positive and valuable community feedback. Thank you much for your trust.
Targeting a PowerShell Version
Let’s play a bit with CompatAware and see how it can clean up the version jungle. There is really just one initial setting to care about: specify the PowerShell version you are targeting.
Simply open the (new) menu “Level”, and choose “CompatAware”, then pick your PowerShell target version. Let’s assume I need to run a script on some older machines with only PowerShell 2.0 available.
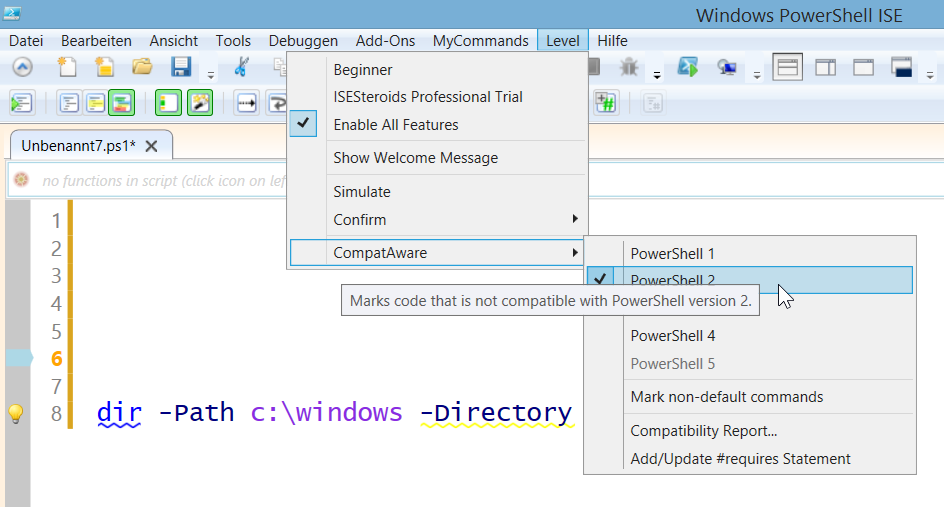
The moment you set a PowerShell target version, ISESteroids starts to highlight all cmdlets, parameters, and language constructs that are not compatible with this version. A yellow squiggle line indicates incompatibilities in real-time, while you code.
That’s important: you don’t want to invest hours of work, just to discover at the end that your approach won’t work at the customer’s site. Real-time information is what let’s you rapidly rethink the route you are taking.
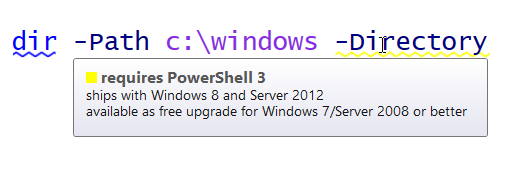
In the screenshot, you actually see two squiggles: the blue squiggle indicates a best practice violation (“do not use aliases in scripts”), and the yellow squiggle reveals that the command “dir” (aka Get-ChildItem) had no -Directory parameter in PowerShell 2.0. It was added only in PowerShell 3.0.
Note that the -Path parameter is not underlined, and neither is the command itself. They both work fine with PowerShell 2.0, and CompatAware is very specific.
Before we dig into the actual compatibility informations delivered by CompatAware, let’s first take a quick tour of technologies that CompatAware shares with the other assistance systems in ISESteroids.
Squiggles provide Hover Information
Squiggles serve just one purpose: to catch your attention and curiosity, yet without distracting you too much. Once you’re hungry for more, simply hover over a squiggle.
Tooltips provide you with extra information, tossing in little doses of PowerShell wisdom when you are ready for it. This way you can refine your scripts and gather extra knowledge while you work.
Squiggles are just the visible tip of an information iceberg and backed by a fully adjustable information system.
Take the descriptive text for example that is provided by yellow squiggle tooltips. It is fully expandable. If you’d like to add your own compatibility notes, take a peek into the folder “Compatibility” inside the ISESteroids program folder. Here, you’ll find simple text files for all compatibility warnings, and you can edit and expand the descriptive text as you like.
Likewise, when you hover over a blue or green squiggle line, you get helpful information about why your code has just violated best practices. And if ISESteroids can fix the issue for you, a “light bulb” shows in the debugger margin, inviting you to click on the bulb to auto-correct all instances of this problem – and then move on to your next task.

Intelligent Syntax Error Analysis
Admittedly, some syntax errors are rather obvious, but others can drive you nuts. So ISESteroids enhances the default tooltip messages with helpful hints, too, that help you solve the puzzle fast.
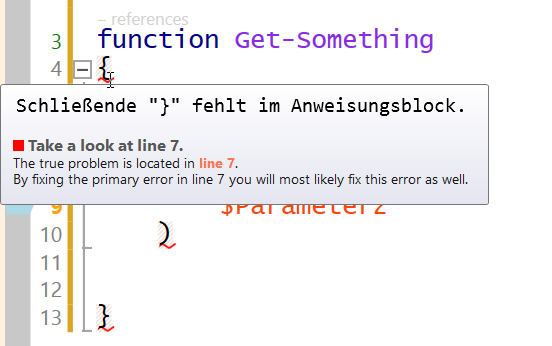
Let’s take a look at a real-world example: some piece of PowerShell code suddenly starts to display multiple red squiggles, as if struck by measles. What’s wrong? And where to start?
First of all, tooltips tell you when you are looking at the wrong spot. Some syntax errors are just artefacts of the true underlying error (and please excuse the original German error messages in the screen shots, no time for MUI fiddles right now).
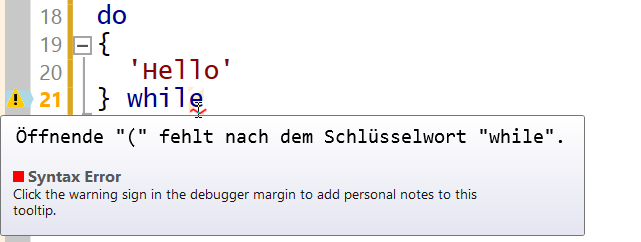
So in the below screenshot, the tooltip indicates that this syntax error is not the root cause, and that you should instead spend your precious time looking at line 7.
When you do this and look at line 7, the tooltip here reveals what needs to be done to get rid of all the red lines: simply “add a comma”! Sometimes, the remedy can be really simple once you know what’s going on. If you have the time to learn more, below this message you get short background infos.
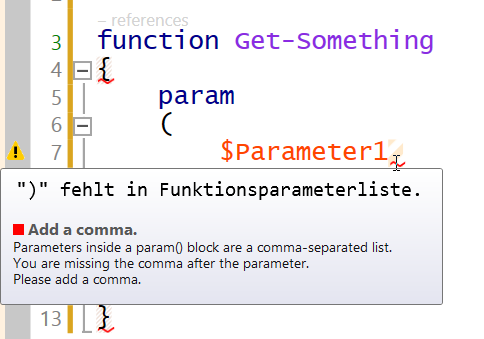
Once you add a comma, all the other syntax errors vanish, and you are good to go.
Of course, ISESteroids cannot know all recipes against all possible syntax errors. Instead, ISESteroids invites you to add your own notes and pieces of wisdom: You can add information to specific syntax errors.
Attach Wisdom to Syntax Errors
When there is no predefined wisdom attached to a syntax error, the tooltip encourages you to add your own content.
To do this, right-click the warning sign in the debugger margin. This opens a context menu. Simply choose “Create/Edit Annotations”. This in turn opens a dialog.
In this dialog, you can now add two things: in the top text box, add a short and precise description of what should be done to get rid of this error. In the text box below, feel free to add explaining descriptions.
Once you are done, click “Apply” to save the annotation. Then, click the link “Open annotation folder”. This opens the folder where ISESteroids saves all of your annotations – they are just plain text files. What’s more interesting is the file name.
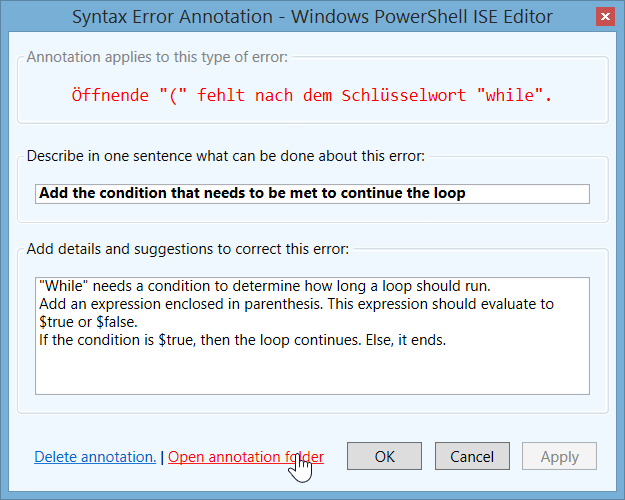
In this example, the file name will be “RCurlynullWhile.txt”, and the file is stored in the folder MissingOpenParenthesisAfterKeyword. As you may have guessed, the folder specifies the kind of syntax error. The file name determines which solution should be displayed.
“RCurlynullWhile.txt” really means: the token before the error should be a “RCurly”, the token at the error should be “null”, and the following token should be “While”. So your annotation is highly specific for a certain syntax error scenario. If you want your annotation to be less specific, simply replace each token that you do not care about with a hyphen. So when you rename the file to “–While.txt”, then your annotation will be displayed for all syntax errors of this kind that deal with the “While” keyword.
Dealing With Runtime Errors
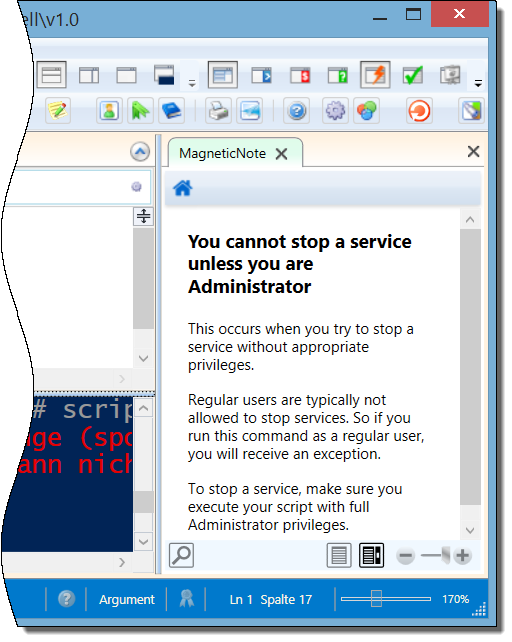
Syntax errors are grammatical errors, much like misspelled words in Word. Runtime errors, in contrast, are revealed only when a script runs. The code is fine, but your script is unable to perform what it wanted to do. Let’s say you were trying to stop a service but your script did not have appropriate privileges.
ISESteroids can detect runtime errors, and will display the same red squiggle line. It even brings runtime errors into view once a script is done, and when you hover over the squiggle, you get information about the runtime error.
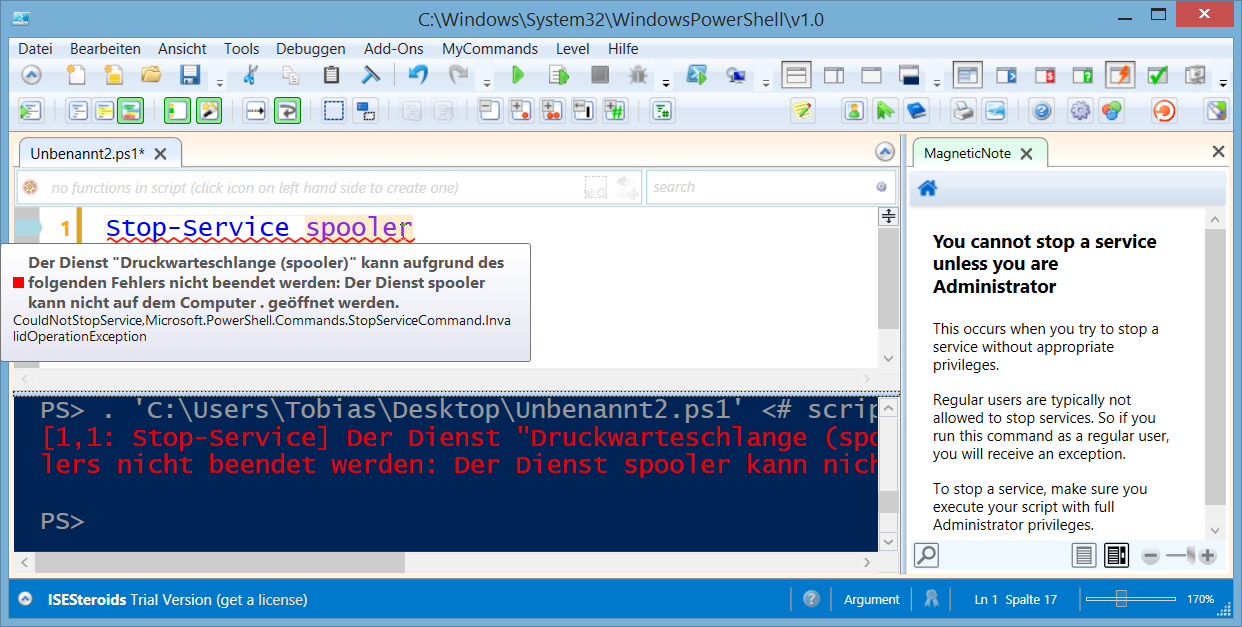
Since runtime errors typically require a bit more information, ISESteroids employs a feature called “MagneticNotes”. You can see MagneticNotes in action when you look at the screen shot: in an add-on panel, MagneticNotes explain why this runtime error occured, and what needs to be done.
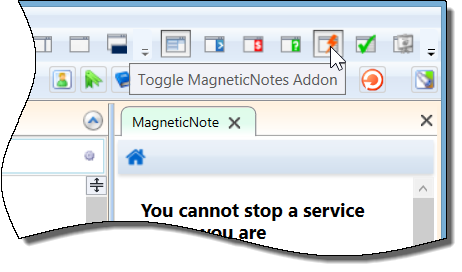
To see MagneticNotes, open the MagneticNotes add-on. You toggle this add-on with the Add-on button displaying a lightning bolt.
Next, click anything inside your editor: a command, a keyword, or a runtime error.
MagneticNotes – Attach Information to Tokens and Errors
MagneticNotes are a quick way of attaching arbitrary information to a specific PowerShell token or runtime error. Instead of searching for information, ISESteroids displays the information when you need it. Once you click a token or runtime error, MagneticNotes show the notes you saved earlier. If there are no notes yet attached to the clicked item, you can add notes and save them.
Likewise, to edit existing notes, simply right-click the annotation, and choose “Edit”.
MagneticNotes can contain plain text, and code samples. To add code samples, select some code in your editor, copy it to the clipboard, and paste it into the MagneticNotes editor.
Finding Dependencies
By now you have a solid understanding of how CompatAware is just another assistance system, sharing the same visual concept of squiggles and just-in-time tooltips and MagneticNotes.
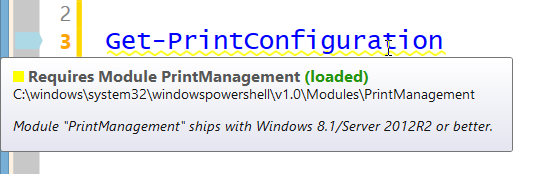
Let’s now return to the original CompatAware feature, and have a final look at the scope of compatibility information it can provide. CompatAware is not limited to PowerShell compatibility issues. It can also pinpoint vital code dependencies, like required external modules or commands.
To get dependency information, open the “Level” menu, choose “CompatAware”, then enable “Mark non-default commands”. Once you do this, ISESteroids adds a yellow squiggle to all commands that are not shipping with PowerShell. This helps you quickly identify commands that originate in optional 3rd party modules.
Auto-Generating #requires
To play safe, a script should either run successfully, or not run at all. The worst scenario always is a script that stalls in the middle of something, leaving you with a lot of cleanup work.
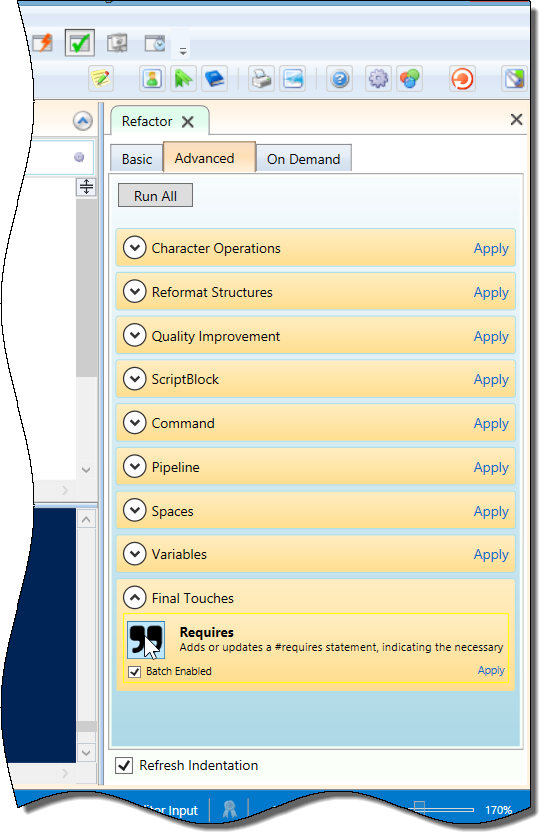
PowerShell scripts can add a #requires statement, listing all the requirements your script needs to successfully run. Since CompatAware already knows what your script needs, it can derive and auto-generate the correct #requires statement for your script. Existing #requires statements are properly updated.
Simply visit the CompatAware menu, and choose “Add/Update #requires statement”, or press CTRL+ALT+R.
You can also use the cmdlet Update-SteroidsRequiresStatement, or run the refactoring addon (the button shows a green checkmark). It will add or update #requires statements automatically as part of the code optimization rules tied to it.
Auto-Generating Compatibility Reports
CompatAware also shares the compatibility info with you. So you can create compatibility reports, or use the compatibility information in your own reporting tools.
To get a compatibility report, visit again the CompatAware menu, and choose “Compatibility Report”. The rich object data can also be directly retrieved:
Get-SteroidsCompatibilityReport -TargetVersion 2 -IncludeDependencies
(Replace “2” with the PowerShell version you want to check against).
What’s Next?
We have so many more ideas for you, and get nourished by your constant stream of feedback and ideas. One of the features you suggested was a better way to switch between multiple editor panes. Try and hold the right mouse button, then move your mouse wheel. Or hold CTRL, then press PageUp or PageDown.
We now focus on getting ISESteroids 2.0 Final out of the door and would like to celebrate this milestone at the 3rd German PowerShell Conference April 22 in the Philharmony in Essen.
Speaking of which: if you are located in Europe, have at least some basic German language skills yet some great PowerShell passion, then be there: April 22+23, Essen, Germany, 12 international speakers including Bruce Payette, Aleksandar Nikolic, Jeff Wouters, Bartek Bielawski, and so many more… a few seats are still available.
And if you like ISESteroids, then supporting the ISESteroids initiative is super easy: just make sure your company orders a really huge number of licenses! Just kidding, but it is true that license revenues fund all of this.
Hopefully we get a chance to meet at the PowerShell Conference!
Share on: