Rapid PowerShell Development with ISESteroids
 Tobias Weltner
- 13 Min To Read
- 14 Mar, 2015
- Comments
Should you frequently experience de-ja-vus while writing PowerShell code – “didn’t I type in this [function|loop|statement|you name it] before?”, “how did this darn syntax for [you name it] work again?” – now there may be a cure available with the latest release of ISESteroids. Grab it at www.powertheshell.com/ if you haven’t installed it already. Build 2.0.15.26 has been released just now.
One of the major enhancements in this release is an intelligent and hierarchical snippet system.
Code snippets can help you insert pieces of code that you frequently need. To be really useful, snippets need to be rapidly available when you need them, and easily customizable.
Let’s check out how snippets work in ISESteroids.
Snippet Insertion While You Type
Whenever you type code, ISESteroids monitors your input, and when it guesses that there might be a suitable snippet, your current word is colorized. When this occurs, simply press TAB to insert the snippet. Colorization is still limited to the editor, but the insertion works in the console, too.
For example, you might be typing a command like this:
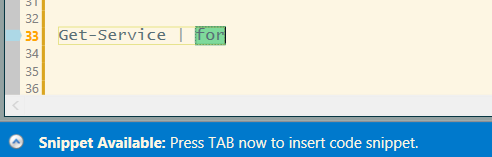
Get-Service
Now you would like to do something with the results, so you want to add a Foreach-Object. While you type “for”, the word “for” gets a colored background. Once you press TAB, the statement is there – bang.
Try the same with “if”, or “else”.
Obviously, ISESteroids can not read your mind, but it manages a list of keyboard shortcuts that are associated with code snippets. To see all shortcuts, try this:
Get-SteroidsSnippetShortcut | Out-GridView
Scope Awareness: Getting the Snippet You Meant
Of course, keyboard shortcuts are limited. For example, the shortcut “for” could be useful for inserting a “for” loop, but it could also be useful for inserting a “foreach-object” statement – depending on what you are currently doing.
ISESteroids can sense what you are doing by looking at your code context, and then decide. For example, a “for” loop won’t make sense in a pipeline, whereas “foreach-object” won’t make sense outside of a pipeline.
The snippet author can define in which scenarios a snippet is useful. This is implemented into the keyword selector:
If you type “for” in an empty line, you get a “for” loop. If you do the same in a pipeline, like in the previous example, you get the “foreach-object” cmdlet.
Intelligent Snippet Adjustment
Simple and static snippets are of great help, but often, the snippet code needs some adjustments. To rapidly get going, there are two types of snippets:
- Simple Snippets just insert some code, and then place the cursor to the position the snippet author defined. Inserting “Foreach-Object” is an example of such a simple snippet.
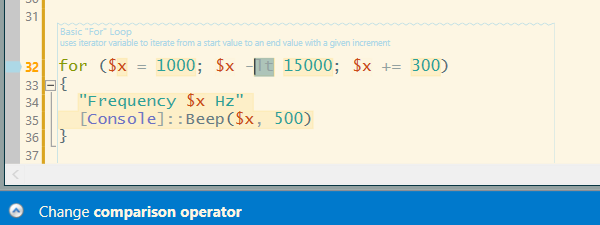
- Advanced Snippets start a special “Adjustment Mode” once inserted. All parts of the inserted code that might need adjustments are highlighted. You can press TAB to move from one selection to another. The status bar tells you what kind of code change is expected from you. When you change variables, all dependent variables also change. And once you press ENTER, the finalized snippet is inserted (you can also press ESC to cancel). Inserting a “for” loop would be an example for an advanced snippet.
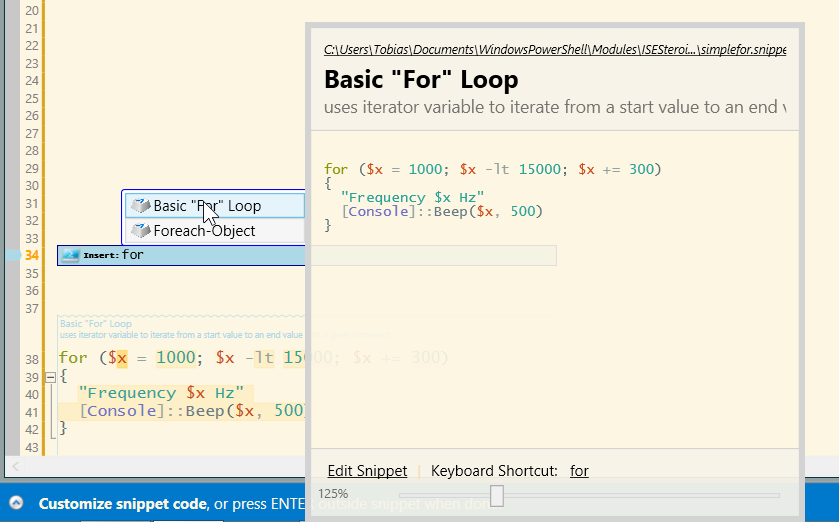
To check out an advanced snippet, do this:
- Open the snippet selector by pressing CTRL+J
- Type in “for” to quickly find the “Basic “For” Loop” snippet, and press ENTER to insert
- The snippet code gets inserted, and the status bar prompts you “Change iteration variable name”. Press TAB to move to the next selection. The status bar now reads “Change start value”.
- Continue and adjust the snippet, then press ENTER. Done.
Note: one thing you should currently not do is press CTRL+Z (Undo) while in insertion mode. Always make sure you complete the process by either pressing ENTER or ESC. Else, the insertion mode may not be cancelled.
More Choices with Hierarchical Snippet Selector
Keyboard shortcuts are great when there is just one snippet for a task. To manage a wealth of snippets, ISESteroids replaces the simple one-dimensional snippet selector built into ISE, with a more sophisticated hierarchical snippet selector. You can open it both in the editor and in the console by pressing CTRL+J, like in the previous example.
It presents available snippets in a tree-like style, and you can navigate the selector solely by keyboard, or with mouse clicks. The selector is highly optimized, which is why you will probably need a little walkthrough to exploit all of its capabilities:
- When you type text BEFORE you press CTRL+J, the text adjacent to the left of your cursor is taken as filter. Only snippets that match this word will be displayed.
- When you type text AFTER you opened the snippet selector, your text input will do two things: it selects the available entries, and it also searches for keyboard shortcuts, displaying matching snippets immediately in your treeview.
- When you press BACKSPACE, you go back one level.
- When you hover over a snippet, you see a code preview. On top, you find a link to the actual snippet file, and clicking the link opens Windows Explorer and shows the file. In the bottom area, you find links to load the snippet into the snippet editor, to make adjustments.
- When you open the snippet selector in the editor, and you are not using the “Beginners UI” (menu “Level”), select “New Folder” to create a new hierarchical folder in your snippet tree. Select “New Snippet” to create a new snippet right at that location. Hang on for details on snippet creation in a second.
Note that the snippet selector, too, is scope-aware. It will show you different snippets, depending on where you are in your code.
Insertion Mode
Often, the need arises to enclose existing code into some structure. Maybe you want to place some code into a block comment, or into a region. Or you decide that some code should really be inside a function, or inside a scriptblock, loop, you-name-it.
To enclose existing code by a snippet, select the code, then press CTRL+J to open the snippet selector.
It now only shows snippets that are suitable for enclosure. Pick one, and your selected code is automatically incorporated into the snippet. Here is an example:
- Type some code, multiple lines
- Select it
- Press CTRL+J
- Type “Region”, or click your way to the “Simple region” snippet, and press ENTER
- Your code is embraced by a collapsible region, and you are asked to give a name to that region.
- Press ENTER to complete the snippet insertion, or press ESC to abort.
By enclosing code into such a region, it becomes collapsible, and you can use the collapse buttons on the secondary ISESteroids toolbar to collapse and expand them, giving you a much better overview of your script document and logical structure.
Creating Snippets
ISESteroids makes it easy to create powerful snippets in just a couple of steps. So whenever you find yourself typing in the same code, consider making it a snippet. And share your snippets with others – after all, snippets are just files.
Here are your options to create a new snippet:
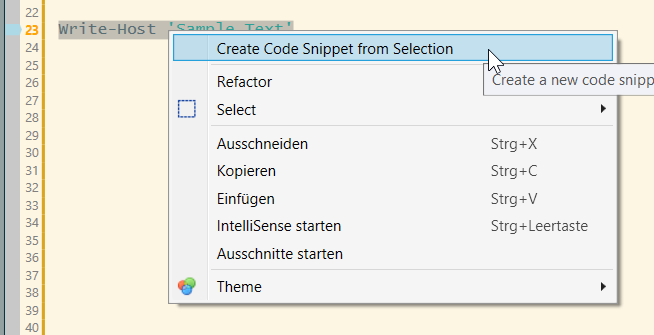
- Select the code you want to turn into a snippet, right-click the selection, and choose “Create Code Snippet From Selection”
- Open the snippet selector by pressing CTRL+J, navigate to where you want to create your snippet, and choose “New Snippet” (only available in the editor snippet selector, not in the console snippet selector).
This opens the completely redesigned snippet editor.
It first wants to know where you want to save your snippet. A dropdown list offers all snippet locations that ISE is aware of: all folders from where ISE has imported snippets, and where you have write permission. So if you want to add more locations to this list, simply make sure you imported snippets from that location before.
Next, if you create the snippet from a selection, pick the place in the snippet tree where you want your snippet to be located. This step is skipped when you open the snippet editor from the selection tree, because here you already defined where to create the snippet.
Finally choose a file name (without extension). Now you are good to go.
In the top area of the snippet editor, make sure you enter a meaningful header and description. Both appear later in the snippet selector, and help people find your snippet.
In the top right corner, define the difficulty level and special requirements. ISESteroids will limit snippets to desired difficulty level and met requirements in the future. To help you choose an appropriate difficulty level, the tooltips define what a user should know about PowerShell for any given difficulty level.
To see the impact that a difficulty level has, you may want to switch the user interface to “Beginner”: choose “Level/Beginner”. The user interface will turn into a very simplistic starter interface, and the difficulty level is reduced. So when you now open the snippet selector via CTRL+J, you will see a lot less snippets. Snippets dealing with advanced topics that are likely to confuse a beginner, are now excluded.
Most importantly, in the right column, assign a keyboard shortcut to your snippet if you want it to be rapidly insertable.
Defining Shortcut Scope
Below the keyboard shortcut, in the right column, select the scope in which your snippet makes sense:
- Editor: anywhere in the editor pane
- Console: anywhere in the console pane
- ScriptBlock: anywhere in a scriptblock, but not in a pipeline, parameter block, comment, or attribute definition
- ParamBlock: only inside a param() statement
- Attribute: only inside an attribute definition
- Pipeline: only within a pipeline
- Comment: only inside of comments
If you do not check anything, the snippet will be insertable anywhere.
Create Simple and Advanced Snippets
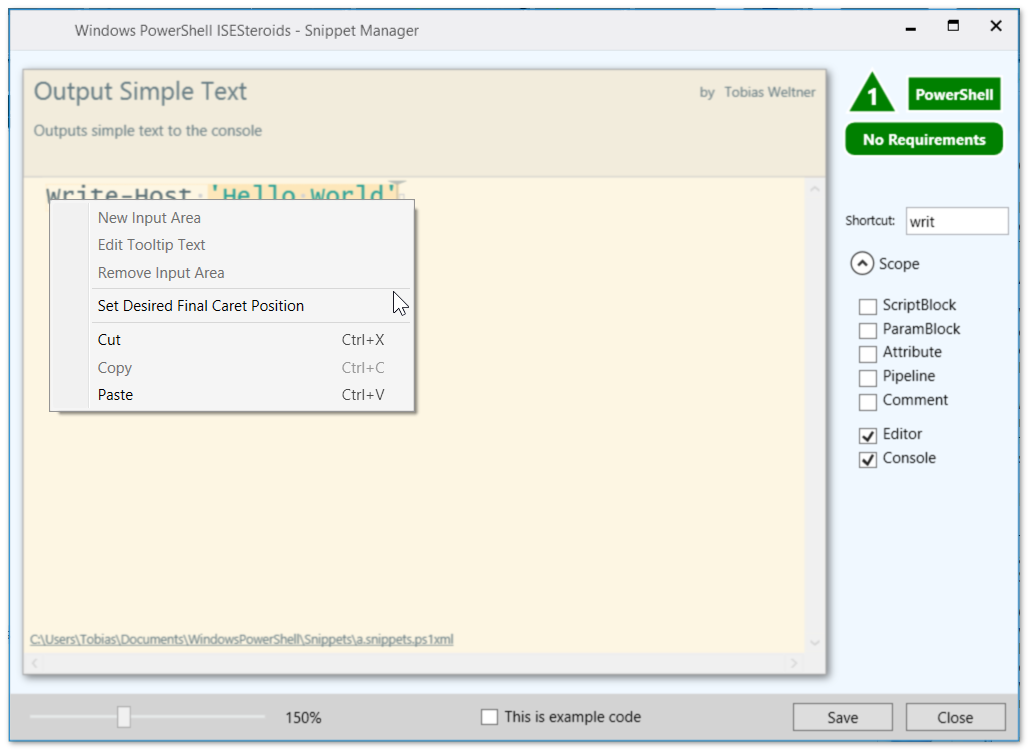
You can now adjust your code in the code editor pane. To define where the cursor should be placed after the snippet gets inserted, right-click the desired position, then choose “Set Desired Final Caret Position”.
To turn your simple snippet into an advanced snippet, optionally start defining user-adjustable input areas:
- Select code that a user should be customizing
- Right-click the selection, and choose “New Input Area”
- Define tooltip and statusbar text. Note that currently tooltip text is not showing up in the UI but will in the future.
- If you want your snippet to be able to “enclose” selected text (as described earlier), check “Enclose Selection Text”. There can always only be one input area that takes selected text.
At the bottom, you see a checkbox “This is example code”. When checked, the snippet is marked as example code. In the future, ISESteroids will separate examples from snippets, but for now this has no effect on snippet insertion.
Once you are done creating your, click Save, then Close. Your snippet is ready for action.
It immediately appears in the snippet selector once you press CTRL+J, and if you assigned a keyboard shortcut, you can now enter the keyboard shortcut and see your shortcut word turn color. Press TAB to rapidly insert.
If you feel you want to edit your snippet again, press CTRL+J, navigate to your snippet, hover over it to open the code preview tooltip, and click “Edit Snippet” in the bottom area of the tooltip.
Using Snippets as Library
The filtering mechanism built into the snippet selector makes it a great lookup tool for any code samples.
Let’s say you found this piece of code, and turned it into a simple snippet:
[Environment]::Is64BitOperatingSystem
When you later type:
[Environ
and press CTRL+J now, you will see all your code snippets that start with this .NET class, organizing all of your samples neatly in one view.
Since the snippet selector takes the filter word only left of the caret, auto-completed matching brackets are not getting into the way.
What Else?
The team added many more features in this release, not just snippet support.
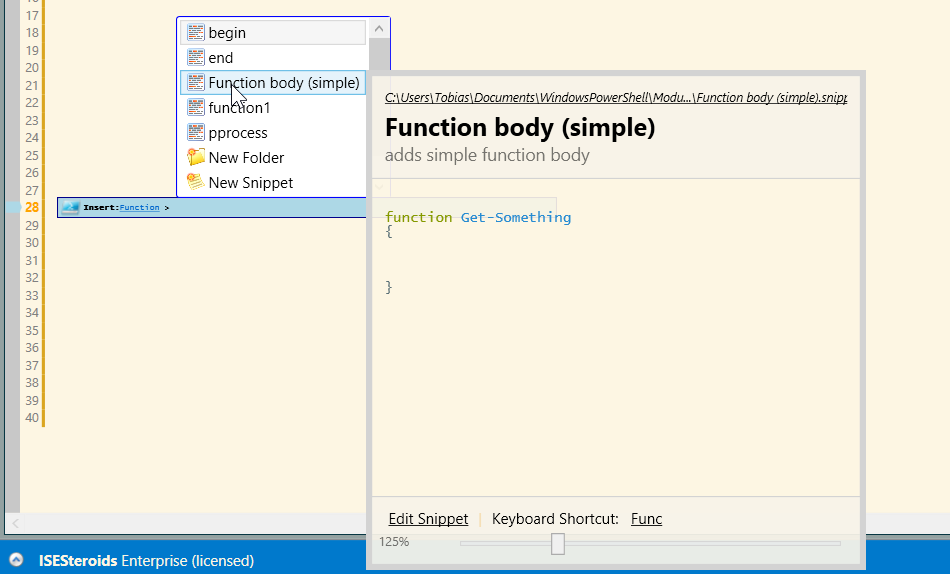
For example, you may have noticed the new icons in the navigation bar. When you click the “New” icon (left side, looks like a star), a new function body is inserted. When you right-click the icon, a context menu lists all snippets that define function bodies, so you can quickly start new functions from snippets. And when you hold CTRL while you click a function snippet in the context menu, it becomes your default function snippet and will now be inserted when you left-click the icon.
Also, make sure you test-drive the all-new “From Syntax…” code generator in the same context menu. It takes valid PowerShell command syntax, and auto-generates the function body and parameter definitions for you.
Once you created a function, check out the icons in the right area of the navigation bar. They let you export one or more functions to a PowerShell module, completing the code generation life-cycle.
The best way to explore new features until documentation is available, is to visit the version history page: http://www.powertheshell.com/isesteroids2/isesteroids-version-history/
Introductory Offer Ends Soon
The ISESteroids team has been working for almost half a year now on finalizing ISESteroids 2.0, taking your input and suggestions, and adding a wealth of productivity features. ISESteroids development has taken a total of two full years, and the result is finally a Visual Studio-like development environment specifically tailored to the needs of PowerShell scripters.
It not just adds features you may be used from Visual Studio, but contains tons of innovative new features. For example, double-click a word to select it, then press CTRL+F. ISESteroids now highlights all instances of this word, and moves focus to the instant search box – unless you chose to hide the navigation bar, in which case you get the default find-and-replace dialog. To toggle the navigation bar, press ALT+N, or click the navigation button in the toolbar.
Press F3 or ENTER to navigate to the next instance.
To replace text, press F2, then type some text.
Or press the all-new CTRL+F3 to switch to “FocusView”: the editor now only displays lines with a search match. CTRL+F3 toggles FocusView, and FocusView gets turned off automatically once you edit your script.
Or click a variable, and press F2. This highlights not just all sibling variables, but also related code that would also be affected by a rename. Type a new name to rename all variables in your script.
There is so much more. F12 toggles distraction free viewing mode. CTRL+F7 toggles bookmarks, and F7 jumps to the next bookmark. This works across all open documents. The next ISESteroids team milestone is to get the documentation done and make all of these features more discoverable to you.
Here is the official announcement: the final ISESteroids 2.0 version will be available April 22, 2015, and presented at the 3rd German PowerShell Konferenz in the Philharmony in Essen.
ISESteroids 2.0 will then be available in two flavors:
- ISESteroids 2.0 Professional: Includes all features from ISESteroids 1.0 plus many more. Same price as ISESteroids 1.0: EUR 99 plus tax.
- ISESteroids 2.0 Enterprise: all features, including advanced debugging, analytical tools, security enhancements. EUR 189 plus tax.
Both versions come with unlimited free updates for ISESteroids 2.0.
The trial version at www.powertheshell.com has the full Enterprise feature set. In the main menu, you can always choose “Level”, then “ISESteroids Professional Trial”, to set the UI and functionality level to “ISESteroids 2.0 Professional”, then test-drive that version, and see which one suits your needs.
Or, you can still take advantage of the introductory offer, and get the full features for the lower price: Until April 22, 2015, any sold ISESteroids 1.0 license will automatically and free of charge upgrade to ISESteroids 2.0 Enterprise.
Share on: