PowerShell Risk Assessment with ISESteroids 2.0
 Tobias Weltner
- 10 Min To Read
- 27 Oct, 2014
- Comments
Sharing scripts and downloading sample code becomes common place. But how do you know a script is safe? You would have to read (and understand) it line by line, and carefully check that the script indeed does what it claims to do, before you run it. This article walks you through a new risk management system built into ISESteroids 2. It is designed to help you manage script risks, and establish trust to other users.
The truth is that most people do not have the time (or the knowledge) to thoroughly check script code. Instead, they take even complex code, try and adjust it to their needs, then run it. This “prayer based script sharing” (PBSS) is risky, especially when you imagine that often these scripts end up being used in production environments.
At the European PowerShell Summit in Amsterdam, I had talks with Jeffrey and his PowerShell team about how to help users quickly assess the potential risk arising from script code, and make this a safer place. Today, I’d like to introduce to you a script risk assessment system built into ISESteroids 2 (introduced in version 2.0.10.24, available for download at www.powertheshell.com/isesteroids2/download).
Quickly Assessing Risks
In everyday life, there must be a quick way for PowerShell users to know whether script code imposes potential risks and needs extended review.
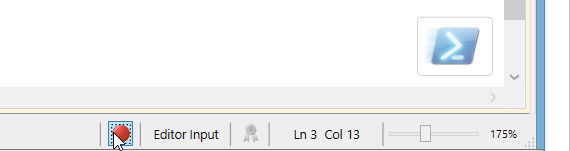
A red icon indicates that there are potential risks in a script that need review
Any script you open in ISESteroids will be internally analyzed, and the result appears in the status bar: you will see a green, yellow, or red icon.

Hovering over the risk icon displays details about the risk
When you hover over the icon, a tooltip appears and tells you why ISESteroids thinks there is a risk, and what you can do about it. For example, in the screen shot, the sample code contained the cmdlet “Set-Service”, and the tooltip declares this risk as a “Minor Risk” and states: “Cmdlets with the verb ‘Set’ will change settings. You need to carefully evaluate which settings are changed, and whether this affects your system stability”. Likewise, ISESteroids displays other detailed instructions for other cmdlets identified as potential risk.
We’ll dive into the risk evaluation engine in a second. At this point, the user is simply consuming risk assessment information and can quickly estimate whether a script needs review, and what kind of risk may exist.
Reviewing Risks
Once ISESteroids displays a yellow or red icon, it is time to review the risks. To review and assess all potential risks in a script, the user would now click the risk icon. This opens a context menu with additional options. To start the review, choose “Show Risks”.
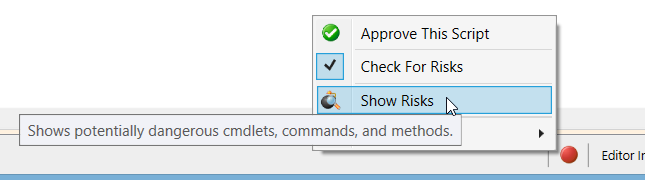
Clicking the risk icon opens a risk management menu that allows for assisted script review
This opens a sliding area beneath the editor and displays the first risk found. The editor will automatically move to the line containing the risk. The user can now quickly look at the actual code and determine whether or not this imposes a risk.
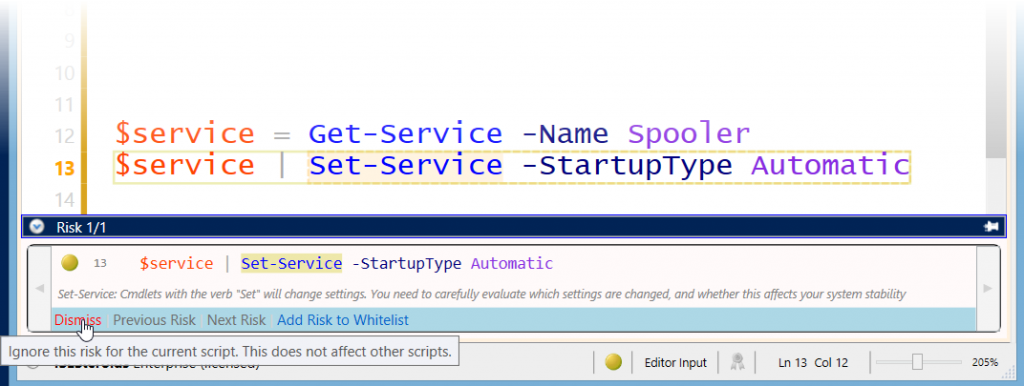
Each risk can be evaluated individually, and dismissed or placed on a white list
If the particular command is found to be safe, the risk can be dismissed by clicking “Dismiss”. It will then be considered “safe” for this risk check only. The sliding area will automatically move on to the next risk (if any additional risks are left).
Or, the user decides that this risk is really never a problem in his or her environment. So if the user wants to treat “Set-Service” as always safe, he or she would click “Add Risk to Whitelist”. This puts the particular risk on the personal white list. This type of risk will then be excluded from future risk checks.
We will look at the white list and the additional ways to configure the risk engine just a bit later.
Approving Script
Once all risks have been evaluated, and no risk is left, the user is done: the script is reviewed and considered safe now. The sliding area now offers to approve the script. You can approve a script temporarily or permanently.
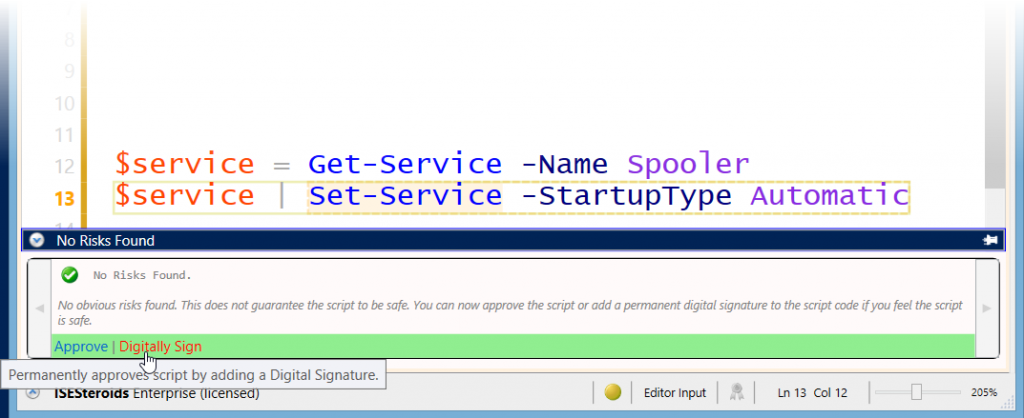
Scripts that are considered “safe” can be approved or digitally signed
When you click “Approve”, the script is treated as “safe” on your machine only. The icon in the statusbar changes to a green checkmark. This information is saved in an NTFS stream, so when you move the script to another place (or haven’t saved it on an NTFS file system in the first place), the approval information is lost once you close the ISE editor.
To permanently approve a script and give others a chance to trust your approval, click “Digitally Sign”. This will add a digital signature to the script file. If you do not own a code signing certificate, ISESteroids offers to create a self-signed certificate for you.
Identifying Trusted Code
Simple script approval (by clicking “Approve”) will help you identify scripts that you have approved earlier on your machine. It will not help others, though, and this type of approval gets lost when you move the file to another place, hand it over to a customer, or upload it to some script repository.
What is needed is a way to preserve the approval inside the script, so users can start to trust each other. Approval can be preserved by adding a permanent digital signature to a script.
A digital signature guarantees that:
- the script was approved by the identity that is represented by the certificate used for signing
- the script content did not change after the signature was applied
So digital signatures are an excellent way of preserving trust. In the past, however, script signing was not widely used, primarily because of some limitations:
- there is no easy way of getting a code signing certificate.
- Purchasing a code signing certificate from a commercial vendor is expensive.
- Self-signed certificates can be issued by anyone and cannot be trusted.
ISESteroids creates new self-signed certificates when needed
This is why ISESteroids ships with important enhancements that overcome these limitations:
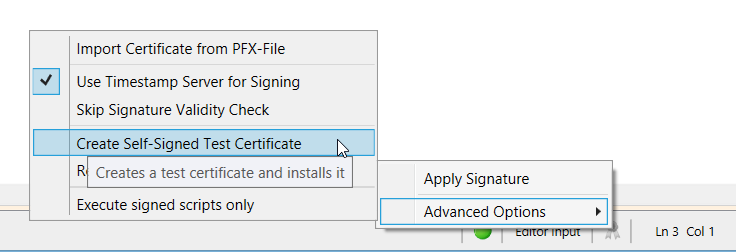
- You can easily create your own self-signed code-signing certificates. Simply click the signature icon in the ISESteroids status bar, and choose Advanced Options/Create Self-Signed Test Certificate
- You can easily sign your scripts. Simply click the signature icon in the ISESteroids status bar, and choose “Apply Signature”. A dialog opens and displays all available code-signing certificates so you can choose the one to sign your script with.
- You can easily verify script integrity. When you load a script that carries a digital signature, the signing icon in the ISESteroids status bar will display an icon indicating whether the signature is trustworthy, and whether the script has changed since. You can hover over the icon to learn more.

The script was signed, but the signer is unknown and untrusted
- You can easily trust a given certificate, even establish trust for a self-signed certificate. When you load a script that contains a digital signature, click the signature icon in the ISESteroids status bar, and choose “Trust This Certificate”. This will place the certificate thumbprint on your personal trust list, and any script signed by that person will be considered trustworthy on your system.
The ability to easily establish trust to self-signed certificates opens a whole new dimension to script trust. A self-signed certificate alone is not safe. Anyone can create one. However, each self-signed certificate is unique and has a unique thumbprint.
So when you establish trust to a particular self-signed certificates that you know is owned by someone you trust, this will allow you to safely identify any other script that was approved by that person. No one else would be able to create another certificate that matches thumbprint and common name.
Effectively, this scheme allows to create trust relationships among colleagues, or even world-wide. When you download script code from a public script repository, and you find that a particular author is doing a great job, provided that this person has signed his scripts, you can trust the author rather than individual scripts, by trusting his digital signature.
Note that digital signatures automatically protect you from script tampering. So if someone you trust has signed a script, and someone changes this script later, the digital signature becomes invalid, and ISESteroids displays a warning message in its status bar.
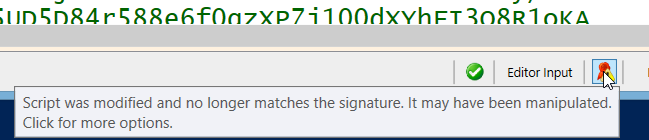
When a signed script was manipulated, ISESteroids displays a warning icon
So if someone tampered with originally signed scripts, you will notice.
And if you do not want to trust a person any longer, simply remove trust: Click the signing icon in the ISESteroids status bar, and uncheck “Trust This Certificate”.
Certificate-Based Auto-Trust
When you load a script file that has a digital signature, ISESteroids automatically checks the signature for validity. If you trust the certificate – either implicitly because of its root certificate, or based on your manual trust – and if the script was not tampered with after the signature was applied, the script will automatically be approved, and you see a green checkmark icon in the status bar.
You can always click this icon to open a menu and manually unapprove, check for risks, or choose “Settings” to disable automatic trust altogether.
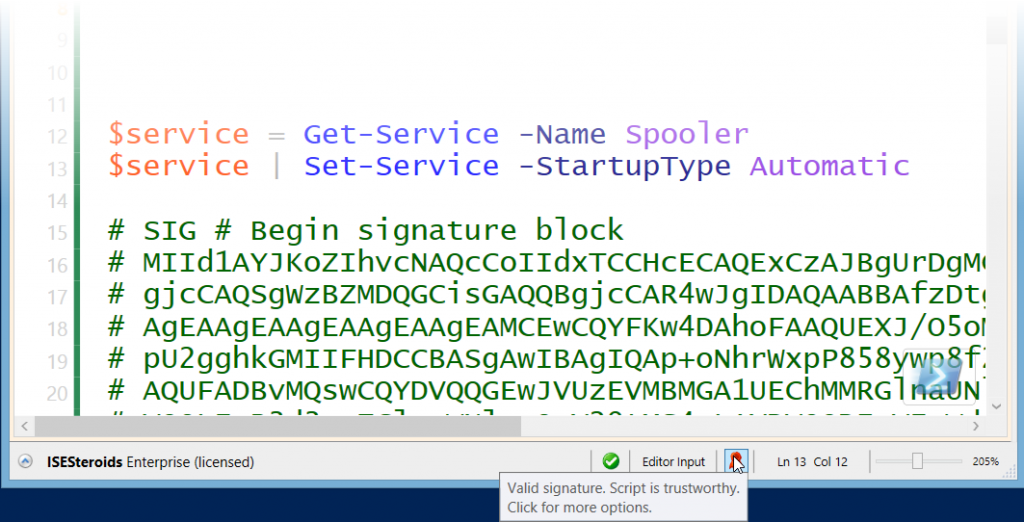
Approved scripts display a checkmark icon. Valid signatures display a red signature icon.
Note that there will be no code signing icon until you save a script. “Untitled” documents are really no scripts and thus cannot be checked for a valid signature, even if they contained a signature block.
Managing Risks and Trusts
The risk assessment engine in ISESteroids is completely configurable to your needs. To configure it, click the risk icon in the status bar, and choose “Settings/Manage Black/White Lists”. This opens up a dialog that lets you manage what is considered a risk. You can also manage the trusted certificates.
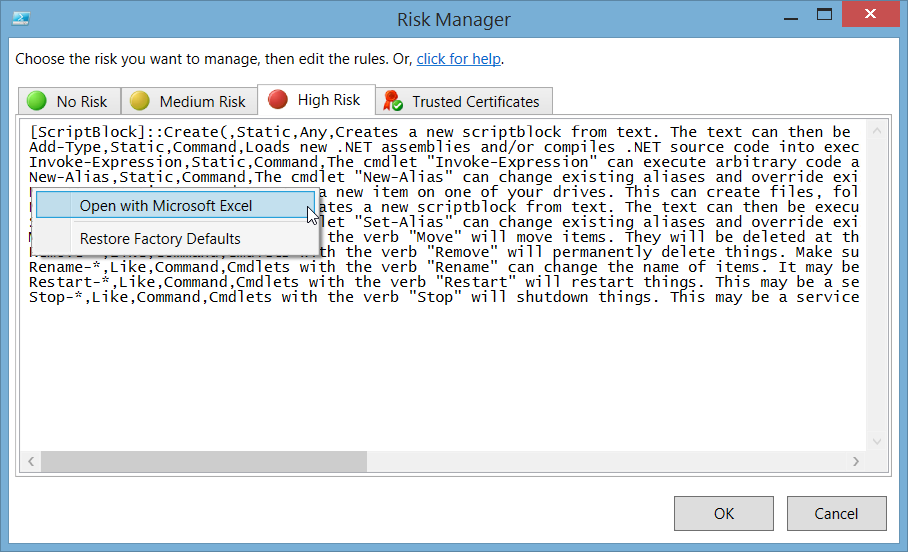
The risk assessment engine is fully configurable to your needs
There are four lists for you to control risk assessment:
- No Risk: Anything in this list is considered “safe” and excluded from risk checks.
- Medium Risk: Anything in this list is considered a “medium risk” and displays a yellow icon
- High Risk: Anything in this list is considered a “high risk” and displays a red icon. Risks in this list are evaluated before risks in the list “medium risk”.
- Trusted Certificates: Contains the thumbprints of certificates that you chose to trust.
The easiest way to manage the lists is to right-click a list and open it in Microsoft Excel. If you do not own Microsoft Excel, you can edit the lists directly, too.
Note: When you edit a list in Microsoft Excel, make sure you close the edited file. Microsoft Excel locks files, so while a particular list is open in Excel, ISESteroids cannot edit it, for example add new entries to the white list.
How Risks are Defined
Each entry in one of the risk lists has up to four columns.
- SearchTerm: this is the text the risk manager is looking for. You can provide literal text, use the wildcard “*”, or provide a regular expression
- SearchType: this declares how the search term is treated. Allowed values are “Static” (use exactly), “Like” (allow wildcard “*”), “RegEx” (treat as regular expression)
- Scope: this declares where the search term is searched. Allowed values are “Command”, “Method”, and “Any”. “Any” will search the search term anywhere in a command expression.
- Description: Optionally, add a textual risk description that appears in dialogs and tooltips, and helps users understand what the particular risk is
When you edit any of these lists, and then click “OK”, the lists are saved. ISESteroids automatically sorts the lists. Lists are sorted by search type first, then by search term. Risks declared as search type “Static” are evaluated before any other because they are most specific.
Share on: