Posh-SSH: Open Source SSH PowerShell Module
 Carlos Perez
- 12 Min To Read
- 03 Jul, 2014
- Comments
What
Posh-SSH is a PowerShell 3.0 or newer module for automating tasks against system using the SSH protocol. The module supports only a subset of the capabilities that the different SSH RFCs http://en.wikipedia.org/wiki/Secure_Shell define but it allows for:
- Establish SSH and SFTP sessions using credentials or OpenSSH keys.
- Connecting through SOCKS and HTTP proxies for both SSH and SFTP sessions.
- Execution of commands in a remote host using SSH Exec command.
- Uploading and downloading of files using SCP and SFTP.
From the SSH standards it supports the following:
- Supports DIFFIE-HELLMAN-GROUP-EXCHANGE-SHA256, DIFFIE-HELLMAN-GROUP-EXCHANGE-SHA1, DIFFIE-HELLMAN-GROUP14-SHA1 and DIFFIE-HELLMAN-GROUP1-SHA1 key exchange methods.
- Supports 3DES-cbc, AES128-CBC, AES192-CBC, AES256-CBC, AES128-CTR, AES192-CTR, AES256-CTR, BlowFish-CBC, CAST128-CBC, ARCFour and TwoFish encryptions.
- Supports HMAC-MD5, HMAC-SHA1, HMAC-RIPEMD160, HMAC-SHA2-256, HMAC-SHA2-256-96, HMAC-MD5-96 and HMAC-SHA1-96 hashing algorithms.
- Supports public key, password, and keyboard-interactive authentication methods
- Supports RSA and DSA private key
- Supports DES-EDE3-CBC, DES-EDE3-CFB, DES-CBC, AES-128-CBC, AES-192-CBC and AES-256-CBC algorithms for private key encryption
- Supports SOCKS4, SOCKS5 and HTTP proxy
Why
I wrote the Posh-SSH module for automating testing of code I wrote in Ruby, Python and other languages in a lab environments where the code runs in a variety of systems than ranged from BSD Linux, OS X and Windows systems where I needed to only execute a series of commands and get the output. I knew I could do this with Python- or Ruby-based great SSH libraries but I took it as a challenge to do it in PowerShell. I found the SSHT.NET library in CodePlex http://sshnet.codeplex.com/ and just started implementing the code in PowerShell. Some of the tasks required the interaction with .NET events and I decided to manage those in C# since examples where already present. It was an interesting experience in my journey of learning how to write a PowerShell module in C#. Posh-SSH was born out of my own technical needs and the opportunity to learn new things.
Install
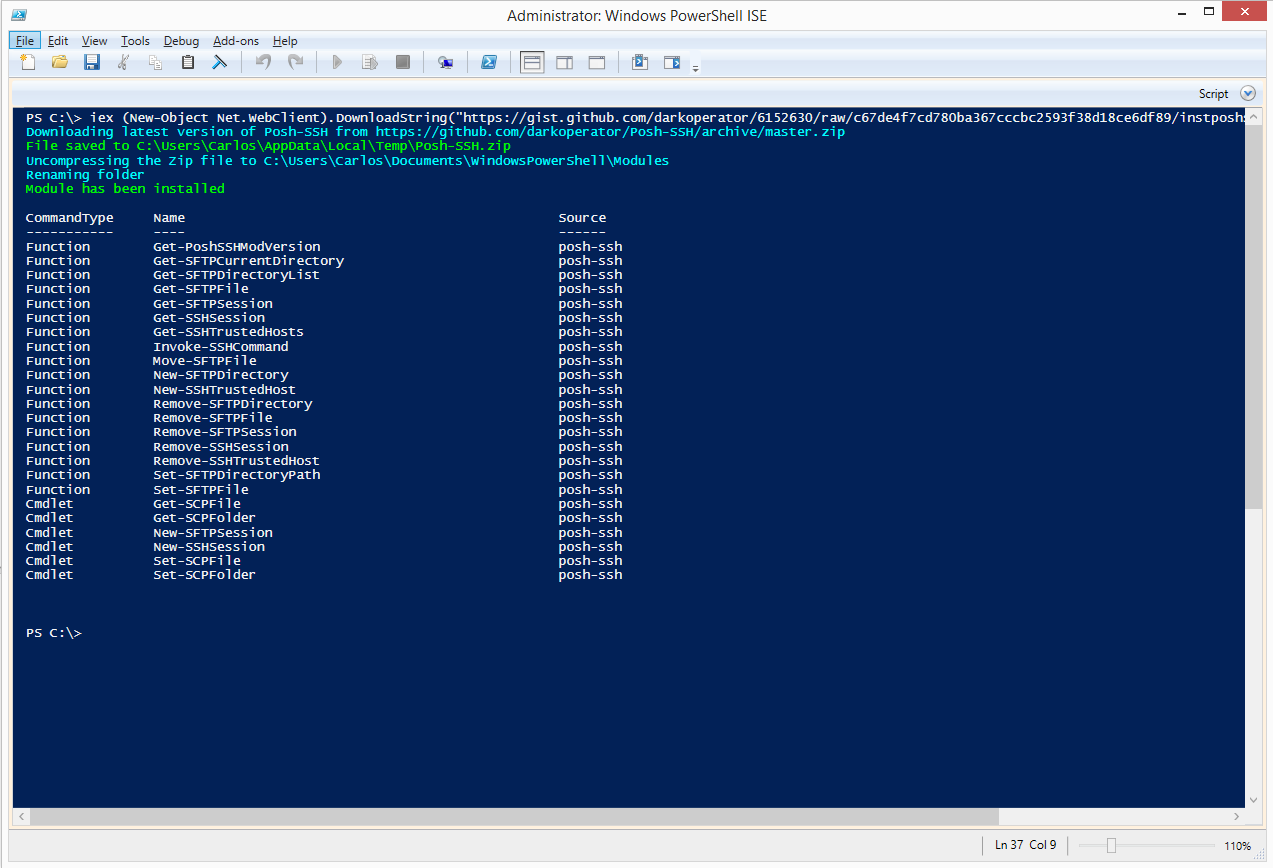
The module is hosted in GitHub at https://github.com/darkoperator/Posh-SSH; all source code for the cmdlets and for the module is available there and it is licensed under the BSD 3-Clause License. The module requires PowerShell 3.0 and .NET Framework 4.0. The quickest way to install the module is by running:
iex (New-Object Net.WebClient).DownloadString("https://gist.github.com/darkoperator/6152630/raw/c67de4f7cd780ba367cccbc2593f38d18ce6df89/instposhsshdev")
This will download the latest version of Posh-SSH and install it in the user’s profile. Once it finishes downloading and copying the module to the right place, it will list the commands available:
Connecting
The way the module works is by establishing sessions to each of the hosts we want to run against. By allowing multiple sessions at once it allows me to control and automate tasks against more than one hosts and not have to re-login to each one. The command to create a new session is New-SSHSession
PS> help New-SSHSession
NAME
New-SSHSession
SYNOPSIS
Creates an SSH Session against a SSH Server
SYNTAX
New-SSHSession [-ComputerName] <String[]> [-Credential] <PSCredential> [-Port <Int32>] [-ProxyServer <String>] [-ProxyPort <Int32>] [-ProxyCredential <PSCredential>] [-ProxyType <String>]
[-ConnectionTimeOut <Int32>] [-KeepAliveInterval <Int32>] [-AcceptKey [<Boolean>]] [-PipelineVariable <String>] [<CommonParameters>]
New-SSHSession [-ComputerName] <String[]> [-Credential] <PSCredential> [-Port <Int32>] [-ProxyServer <String>] [-ProxyPort <Int32>] [-ProxyCredential <PSCredential>] [-ProxyType <String>]
[-KeyFile <String>] [-ConnectionTimeOut <Int32>] [-KeepAliveInterval <Int32>] [-AcceptKey [<Boolean>]] [-PipelineVariable <String>] [<CommonParameters>]
DESCRIPTION
Creates an SSH Session against a remote server. The command supports creating connection thru a Proxy and allows for authentication to the server using username and password. If a key file is
specified the command will use the password in the credentials parameter as the paraphrase of the key.
RELATED LINKS
REMARKS
To see the examples, type: "get-help New-SSHSession -examples".
For more information, type: "get-help New-SSHSession -detailed".
For technical information, type: "get-help New-SSHSession -full".
When we establish a new session for the first time it will check SSH server certificate fingerprint and IP address combination to those saved in HKEY_CURRENT_USER\Software\PoshSSH registry key; if there is a mismatch it will generate an error that the fingerprint did not match and if it is not present it will show the fingerprint and ask if you want to trust or not the host before connecting:
PS> New-SSHSession -ComputerName "192.168.1.191" -Credential (Get-Credential carlos)

Server SSH Fingerprint
Do you want to trust the fingerprint 62:ef:96:b6:f8:a9:6c:7c:34:29:e6:d6:ba:59:ad:2f
[] Y  [] N  [?] Help (default is "N"): Y

Index Host             Connected
----- ----             ---------
  0   192.168.1.191    True
We can see all the hosts we trust using the Get-SSHTrustedHost command and one can remove hosts from the trusts list using Remove-SSHTrustedHost:
PS> Get-SSHTrustedHost | fl

SSHHost     : 192.168.1.191
Fingerprint : 62:ef:96:b6:f8:a9:6c:7c:34:29:e6:d6:ba:59:ad:2f
When the session is created, we can look at the session using the Get-SSHSession command
PS> Get-SSHSession | fl

Connected : True
Index     : 0
Host      : 192.168.1.191
Session   : Renci.SshNet.SshClient
Each session has the Index property that can be used with other commands or the object that is returned.
To disconnect from the hosts we use the Remove-SSHSession
PS> Remove-SSHSession -Index 0 -Verbose

VERBOSE: 0
VERBOSE: Removing session 0
True
VERBOSE: Session 0 Removed
Executing Command
We can execute commands against a session or sessions using the Invoke-SSHCommand command. When a command is executed an object representing the results of the execution is returned. When executed it instantiates on the system a new instance of the default shell configured on the system, executes the command and returns an object and the exit status of the last command executed.
PS> Invoke-SSHCommand -Index 0 -Command "uname -a"

Host       : 192.168.1.191
Output     : Linux testdebian7 3.2.0-4-amd64 #1 SMP Debian 3.2.51-1 x86_64 GNU/Linux
ExitStatus : 0
In the case of Linux/Unix systems when the command string is given to the shell, the instance is closed so it will retain the state because the shell instance is closed after each execution.
PS> Invoke-SSHCommand -Index 0 -Command "pwd"
Host       : 192.168.1.191
Output     : /home/carlos
ExitStatus : 0

PS> Invoke-SSHCommand -Index 0 -Command "cd /"
Host       : 192.168.1.191
Output     :
ExitStatus : 0

PS> Invoke-SSHCommand -Index 0 -Command "pwd"
Host       : 192.168.1.191
Output     : /home/carlos
ExitStatus : 0
But in the case of Linux or Unix we can chain command with the shell command terminator and have the shell run them.
PS C:\> Invoke-SSHCommand -Index 0 -Command "uname -a; cd /; pwd; ls -l"
Host       : 192.168.1.191
Output     : Linux testdebian7 3.2.0-4-amd64 #1 SMP Debian 3.2.51-1 x86_64 GNU/Linux
             /
             total 88
             drwxr-xr-x   2 root root  4096 Dec 17  2013 bin
             drwxr-xr-x   3 root root  4096 Dec 17  2013 boot
             drwxr-xr-x  13 root root  3200 Jun 28 11:16 dev
             drwxr-xr-x 133 root root 12288 Jun 28 11:16 etc
             drwxr-xr-x   3 root root  4096 Dec 17  2013 home
             lrwxrwxrwx   1 root root    30 Dec 17  2013 initrd.img -> /boot/initrd.img-3.2.0-4-amd64
             drwxr-xr-x  15 root root  4096 Dec 17  2013 lib
             drwxr-xr-x   2 root root  4096 Dec 17  2013 lib64
             drwx------   2 root root 16384 Dec 17  2013 lost+found
             drwxr-xr-x   4 root root  4096 Oct 13  2013 media
             drwxr-xr-x   2 root root  4096 Sep 22  2013 mnt
             drwxr-xr-x   2 root root  4096 Oct 13  2013 opt
             dr-xr-xr-x 105 root root     0 Jun 28 11:15 proc
             drwx------   3 root root  4096 Dec 17  2013 root
             drwxr-xr-x  19 root root   880 Jun 28 11:16 run
             drwxr-xr-x   2 root root  4096 Dec 17  2013 sbin
             drwxr-xr-x   2 root root  4096 Jun 10  2012 selinux
             drwxr-xr-x   2 root root  4096 Oct 13  2013 srv
             drwxr-xr-x  13 root root     0 Jun 28 11:15 sys
             drwxrwxrwt   6 root root  4096 Jun 28 14:17 tmp
             drwxr-xr-x  10 root root  4096 Dec 17  2013 usr
             drwxr-xr-x  12 root root  4096 Dec 17  2013 var
             lrwxrwxrwx   1 root root    26 Dec 17  2013 vmlinuz -> boot/vmlinuz-3.2.0-4-amd64
ExitStatus : 0
This will work with Unix, Linux and even Windows systems running SSH.
One special case is with Cisco equipment where after execution of the command the Cisco equipment terminated the connection. In this case we can create a console using the SSH session object. When we create the console, it reruns a console stream object to which we can write commands we want to execute, terminating them with e new line and then read the output that was generated by reading the stream.
PS> $session = Get-SSHSession -Index 1
PS> $stream = $session.Session.CreateShellStream("dumb", 0, 0, 0, 0, 1000)
PS> $stream.Write("show ver`n")
PS> $stream.Read()
TSGAP01#show ver
Cisco IOS Software, C1240 Software (C1240-K9W7-M), Version 12.3(8)JA, RELEASE SOFTWARE (fc2)
Technical Support: http://www.cisco.com/techsupport
Copyright (c) 1986-2006 by Cisco Systems, Inc.
         Compiled Mon 27-Feb-06 09:17 by ssearch
     ROM: Bootstrap program is C1240 boot loader
     BOOTLDR: C1240 Boot Loader (C1240-BOOT-M) Version 12.3(7)JA1, RELEASE SOFTWARE (fc1)

     TSGAP01 uptime is 2 minutes
     System returned to ROM by power-on
     System image file is "flash:/c1240-k9w7-mx.123-8.JA/c1240-k9w7-mx.123-8.JA"

     This product contains cryptographic features and is subject to United
     States and local country laws governing import, export, transfer and
     use. Delivery of Cisco cryptographic products does not imply
     third-party authority to import, export, distribute or use encryption.
     Importers, exporters, distributors and users are responsible for
     compliance with U.S. and local country laws. By using this product you
     agree to comply with applicable laws and regulations. If you are unable
     to comply with U.S. and local laws, return this product immediately.
      --More--
PS> $stream.Write("`n")
PS> $stream.Read()
TSGAP01#
Uploading and Downloading Files with SCP
The module also provides SCP commands for uploading and downloading files. SCP works by establishing a connection and copying or downloading the file specified depending on the action selected.
For uploading a file we use the Set-SCPFile cmdlet. We need to specify a server, credentials, a local file that we want to upload, and the full path and name of the full path of the destination file.
PS C:\> Set-SCPFile -LocalFile .\Downloads\VMware-PowerCLI-5.5.0-1671586.exe -RemoteFile "/tmp/powercliinstaller.exe" -ComputerName 192.168.10.3 -Credential (Get-Credential root)
The cmdlet provides progress information about the uploaded bytes.

To download a file the process is similar, but we use the Get-SCPFile cmdlet.
PS C:\> Get-SCPFile -LocalFile .\Downloads\VMware-PowerCLI.exe -RemoteFile "/tmp/powercliinstaller.exe" -ComputerName 192.168.10.3 -Credential (Get-Credential root)
We can also do the same with folder using Get-SCPFolder and Set-SCPFolder. The cmdlet will upload all files recursively.
Using SFTP
The module also provides SFTP support. The SFTP commands also work with sessions. To create a SFTP session we use the New-SFTPSession cmdlet. It uses the same list of trusted hosts as the one for SSH sessions.
PS> New-SFTPSession -ComputerName 192.168.10.3 -Credential (Get-Credential root) -Verbose | fl
VERBOSE: Using Username and Password authentication for connection.
VERBOSE: Connecting to 192.168.10.3 with user root

Connected : True
Index     : 0
Host      : 192.168.10.3
Session   : Renci.SshNet.SftpClient
Just like with SSH commands, SFTP commands use the index of the session or the session object itself to specify a session. Use the Get-SFTPSession command to get all SFTP sessions or a specified one.
PS> Get-SFTPSession  | fl

Connected : True
Index     : 0
Host      : 192.168.10.3
Session   : Renci.SshNet.SftpClient
One big difference between SSH and SFTP sessions is that the SFTP session is just like FTP. A stateful one where we can change directory paths and the session remains on that location. We can get our current location on the system using the Get-SFTPCurrentDirectory command and we can change location using Set-SFTPDirectoryPath cmdlet.
PS> Get-SFTPCurrentDirectory -Index 0
/root

PS> Set-SFTPDirectoryPath -Index 0 -Path /usr/bin

PS> Get-SFTPCurrentDirectory -Index 0
/usr/bin
We can get directory listings using the Get-SFTPDirectoryList command–the command will return a collection of objects referring to each of the files and directories in the given path.
PS> Get-SFTPDirectoryList -Index 0 -Path /tmp

FullName       : /tmp/vmware-config2
LastAccessTime : 12/28/2013 8:54:40 AM
LastWriteTime  : 12/28/2013 8:54:40 AM
Length         : 4096
UserId         : 0

FullName       : /tmp/vmware-fonts0
LastAccessTime : 2/8/2013 7:50:24 PM
LastWriteTime  : 2/8/2013 7:50:24 PM
Length         : 4096
UserId         : 0

FullName       : /tmp/vmware-root
LastAccessTime : 6/28/2014 3:00:52 PM
LastWriteTime  : 6/28/2014 3:00:52 PM
Length         : 4096
UserId         : 0

FullName       : /tmp/vmware-config0
LastAccessTime : 2/8/2013 7:50:00 PM
LastWriteTime  : 2/8/2013 7:50:00 PM
Length         : 4096
UserId         : 0

FullName       : /tmp/poshssh
LastAccessTime : 6/28/2014 7:57:30 PM
LastWriteTime  : 6/28/2014 7:58:38 PM
Length         : 4096
UserId         : 0

FullName       : /tmp/vmware-fonts1
LastAccessTime : 4/26/2013 2:23:16 PM
LastWriteTime  : 4/26/2013 2:23:16 PM
Length         : 4096
UserId         : 0

FullName       : /tmp/vmware-tools-distrib
LastAccessTime : 12/28/2013 8:36:20 AM
LastWriteTime  : 8/17/2013 1:51:12 PM
Length         : 4096
UserId         : 0

FullName       : /tmp/vmware-fonts2
LastAccessTime : 12/28/2013 8:55:01 AM
LastWriteTime  : 12/28/2013 8:55:01 AM
Length         : 4096
UserId         : 0

FullName       : /tmp/.
LastAccessTime : 6/28/2014 9:42:56 PM
LastWriteTime  : 6/28/2014 9:39:44 PM
Length         : 4096
UserId         : 0

FullName       : /tmp/.ICE-unix
LastAccessTime : 6/28/2014 3:00:50 PM
LastWriteTime  : 6/28/2014 3:00:50 PM
Length         : 4096
UserId         : 0

FullName       : /tmp/vmware-config1
LastAccessTime : 4/26/2013 2:22:52 PM
LastWriteTime  : 4/26/2013 2:22:52 PM
Length         : 4096
UserId         : 0

FullName       : /tmp/..
LastAccessTime : 6/28/2014 3:00:51 PM
LastWriteTime  : 6/28/2014 3:00:50 PM
Length         : 4096
UserId         : 0

PS> Get-SFTPDirectoryList -Index 0 -Path /tmp | gm

   TypeName: Renci.SshNet.Sftp.SftpFile

Name              MemberType Definition
----              ---------- ----------
Delete            Method     void Delete()
Equals            Method     bool Equals(System.Object obj)
GetHashCode       Method     int GetHashCode()
GetType           Method     type GetType()
MoveTo            Method     void MoveTo(string destFileName)
SetPermissions    Method     void SetPermissions(int16 mode)
ToString          Method     string ToString()
UpdateStatus      Method     void UpdateStatus()
Attributes        Property   Renci.SshNet.Sftp.SftpFileAttributes Attributes {get;set;}
Extensions        Property   System.Collections.Generic.IDictionary[string,string] Extensions {get;set;}
FullName          Property   string FullName {get;set;}
GroupCanExecute   Property   bool GroupCanExecute {get;set;}
GroupCanRead      Property   bool GroupCanRead {get;set;}
GroupCanWrite     Property   bool GroupCanWrite {get;set;}
GroupId           Property   int GroupId {get;set;}
IsBlockDevice     Property   bool IsBlockDevice {get;}
IsCharacterDevice Property   bool IsCharacterDevice {get;}
IsDirectory       Property   bool IsDirectory {get;}
IsNamedPipe       Property   bool IsNamedPipe {get;}
IsRegularFile     Property   bool IsRegularFile {get;}
IsSocket          Property   bool IsSocket {get;}
IsSymbolicLink    Property   bool IsSymbolicLink {get;}
LastAccessTime    Property   datetime LastAccessTime {get;set;}
LastAccessTimeUtc Property   datetime LastAccessTimeUtc {get;set;}
LastWriteTime     Property   datetime LastWriteTime {get;set;}
LastWriteTimeUtc  Property   datetime LastWriteTimeUtc {get;set;}
Length            Property   long Length {get;}
Name              Property   string Name {get;set;}
OthersCanExecute  Property   bool OthersCanExecute {get;set;}
OthersCanRead     Property   bool OthersCanRead {get;set;}
OthersCanWrite    Property   bool OthersCanWrite {get;set;}
OwnerCanExecute   Property   bool OwnerCanExecute {get;set;}
OwnerCanRead      Property   bool OwnerCanRead {get;set;}
OwnerCanWrite     Property   bool OwnerCanWrite {get;set;}
UserId            Property   int UserId {get;set;}
When working with files we can move, delete, upload, and download a specified files on a SFTP:
- Get-SFTPFile – Download a specified file from a remote SFTP session.
- Move-SFTPFile – Moves a specified file in a remote hosts through SFTP (Can be used to rename a file)
- Remove-SFTPFile – Deletes a specified file in a remote hosts through SFTP.
- Set-SFTPFile – Uploads a specified file to a given path using SFTP.
We can also create and delete directories on a target system:
- New-SFTPDirectory – Creates a directory in a remote hosts through SFTP.
- Remove-SFTPDirectory – Deletes a specified directory in a remote hosts through SFTP.
The Posh-SSH module should cover most of the basic needs. Each of the sessions include the session object that provides additional methods and properties. Most commands also return objects with additional methods and properties not shown by default that can be leveraged by an advanced user. I hope you find the module useful and if you come up with a new command or a bug fix do not hesitate to contribute.
Share on: