Provisioning and Licensing Office 365 Accounts with PowerShell
 Mike Pfeiffer
- 9 Min To Read
- 23 Apr, 2012
- Comments
The Office 365 platform provides a PowerShell module that can be used to provision and manage user accounts. You can even automate the process of assigning licenses to users in the cloud using the cmdlets in this module. However, the method you’ll need to use to get your users setup will depend on the type of deployment you’ll be using with the service.
Right now you might be using the Quest Active Directory cmdlets, the Active Directory PowerShell module, or even ADSI to automate the process of provisioning user accounts on premises. When you decide to start utilizing the cloud services offered through Office 365, this may or may not need to change. For example, you might be planning on using Single Sign On, also known as Identity Federation, or implementing an Exchange hybrid deployment with Office 365. In this case, you’ll want to continue to provision user accounts on premises, the same as you do today, and your accounts will be synchronized to the cloud during the Directory Synchronization (DirSync) process.
If you won’t be using DirSync, you may want to automate the provisioning of your Office 365 accounts, and in either case, you can automate the task of licensing your users with the Microsoft Online Services Module for PowerShell.
Installing the Microsoft Online Services Module
There are some prerequisites that you need to be aware of before you download and install the Microsoft Online Services Module for PowerShell.
- Operating System – you’ll need to be running Windows 7 or Windows Server 2008 R2
- .NET Framework – the 3.5.1 version of the .NET Framework needs to be installed
- Microsoft Online Services Sign-In Assistant – log into the Office 365 portal, and under resources, click on Downloads. At the bottom of the screen, choose the option to Set up and configure your Office desktop apps.
Once you’ve verified the prerequisites are in place, you can download and install the module. You can get the appropriate version of module for your operating system using the following URLs.
- 32-bit Module – http://go.microsoft.com/fwlink/?linkid=236345
- 64-bit Module – http://go.microsoft.com/fwlink/?linkid=236293****
Getting Connected
If you chose the default options when installing the module, you’ll have an icon on the desktop called Microsoft Online Services Module for Windows PowerShell. To get started, you can run PowerShell using this shortcut, or manually import the module into your standard PowerShell console using the Import-Module MSOnline command.
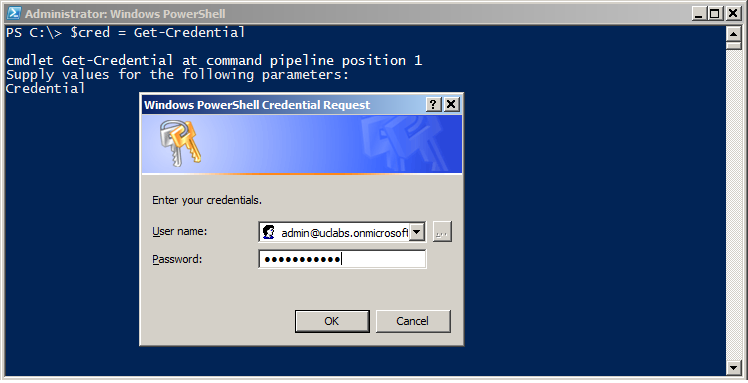
Once the module is imported into your shell session, you can connect to your Office 365 tenant and start managing your accounts. First, you’ll need to create a credential object using the Get-Credential cmdlet that will store your Office 365 tenant administrator credentials.
| |
Then you can run the Connect-MsolService cmdlet and assign the credential object to the -Credential parameter.
| |
This command should complete without returning anything to the screen, and at that point, you’ll be connected to your Office 365 tenant.
Reviewing Licenses
After you’re connected, you can view your current licensing configuration using the Get-MsolAccountSku cmdlet. This will provide you with several details, including how many licenses are being consumed, and how many are currently available:

If you want to license users as they are created them from the shell, or after they’ve been synchronized to the cloud with DirSync, you’ll need to know the AccountSkuId, which is in the format of tenant:SkuPartNumber. As you can see in Figure 1-2, I’ve signed up for an Enterprise account, my tenant name is uclabs, and I’m using 5 of my 25 licenses.
Provisioning User Accounts
To provision one or more user accounts, use the New-MsolUser cmdlet. For example, the following command will create a single user account and assign my Enterprise license during the provisioning process:
| |
Notice that the -Password parameter was not used to assign an initial password, and in the output shown in Figure 1-3, you can see that a random password was assigned to the user account when it was created.

Additionally, you have the option of manually specifying a password using the -Password parameter.

As you can see in Figure 1-4, unlike most cmdlets that create user accounts, the value provided for the -Password parameter is not a secure string object, and must be a simple string value. Also keep in mind that by default, accounts will require strong passwords based on the following criteria:
- The password should contain at least one lowercase and one uppercase letter
- The password should contain one non-alphanumeric character
- No spaces, tabs, or line breaks are allowed
- You can’t set the password to the same value as the user name
If these password complexity requirements are too strict, you can set the -StrongPasswordRequired to $false. This parameter is available with the New-MsolUser cmdlet, and you can disable the strong password requirements for an account using the same parameter on the Set-MsolUser cmdlet.
Selective Licensing
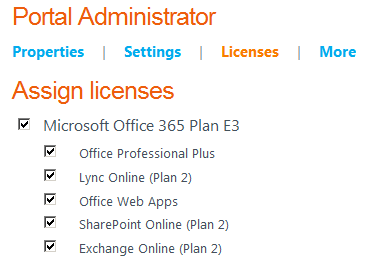
Office 365 licenses can contain a subset of service plans. For example, when viewing the licensing settings in the Microsoft Online Services Portal for a user assigned an E3 plan license, you’ll see a screen similar to Figure 1-5 that displays each product.
Instead of assigning all of the service plans available with the E3 license, you may only need to assign a subset of these, such as Office Professional Plus and Exchange Online. In order to do this from the shell, you’ll need to be able to view the service plan information to determine what your options are. In this case, we’re interested in the service plan details for the EnterprisePack sku, so we again turn to the Get-MsolAccountSku cmdlet. Here’s a one-liner that will provide this information:
| |
You can view the output from this one-liner in Figure 1-6.
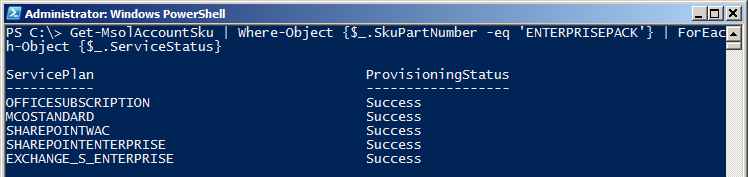
This allows us to view each service plan individually, just as we would when logged into the portal. The service plan names might not be obvious at first glance. Here’s a breakdown of what each of these really are:
- OFFICESUBSCRIPTION – Office Professional Plus
- MCOSTANDARD – Lync Online
- SHAREPOINTWAC – Microsoft Office Web Apps
- SHAREPOINTENTERPRISE – SharePoint Online
- EXCHANGE_S_ENTERPRISE – Exchange Online
Now that we have this information, we can be selective about the licensing for our users. For example, we can modify the account we created earlier and change the license options so that the user is only assigned Office Professional Plus and Exchange Online licenses. In order to do that, we’ll need to create a LicenseOption object using the New-MsoLicenseOptions cmdlet. When running the cmdlet, we specify the account sku id, which in this case would be in the format of tenant:ENTERPRISEPACK, and then we disable the service plans that we do not want to be include in the object. We can do this by assigning an array of service plan items that we do not want the user to have to the DisabledPlans parameter:
| |
In this example, the resulting LicenseOption object is saved to the $options variable, which can then be assigned to the_LicenseOptions_ parameter when modifying the account:
| |
You could also use this technique during the provisioning process. You would just need to assign the $options object to the LicenseOptions parameter when creating the account:
| |
It’s worth mentioning that Exchange Online also can be managed using the Exchange Management Shell via PowerShell remoting. However, when you assign an Exchange license using the Microsoft Online Services Module for Powershell, it will automatically mailbox-enable the account.
Bulk Licensing
You may need to regularly assign licenses to accounts. This is especially true if you’ll be using DirSync, as user accounts provisioned on premises will be synched to the cloud, but will eventually need to be assigned a license. You can use the Get-MsolUser cmdlet to determine which users are currently unlicensed using the UnlicensedUsersOnly switch parameter:


To ensure that each user is licensed, you can retrieve all unlicensed users, pipe those objects down to the Set-MsolUserLicense cmdlet, and apply a license to each account. First, you’ll need to ensure that a usage location is set for your accounts. This example would set the usage location to the United States for all of my unlicensed accounts:
| |
Next, I can then license those users:
| |
Additionally, you could use the LicenseOptions parameter if you need to selectively apply service plans to your accounts.
Provisioning Accounts in Bulk from a CSV File
There is an option in the web based portal where a CSV file can be uploaded to create user accounts in bulk. This works really well, but it is an interactive process. If accounts need to be provisioned and licensed automatically, an automated script that leverages a CSV file and the New-MsolUser cmdlet can be used. Let’s take a look at how we could do this using the CSV file shown in Figure 1-8.
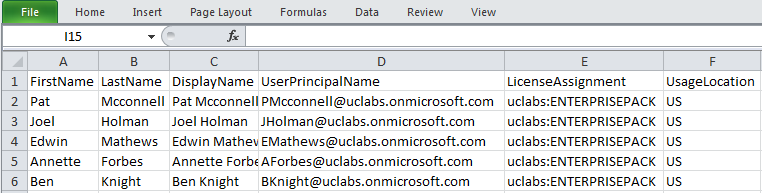
Each of the column names in the CSV file correspond to the parameter names we used earlier with the New-MsolUser cmdlet. Using the Import-CSV cmdlet, we can read this file into the shell, loop through each record, and create and license an Office 365 account for each of our users. Here is some code that would accomplish this:
| |
The only problem here is that if we run this code as-is, a random password will be generated for each user, and we’re not capturing that information. We can make a small change and simply pipe the results to a file that can be used to document the passwords for the newly created accounts:
| |
This time we’ve added the Export-CSV command to the end of our script, which will store the account information, along with the random password generated for each user. We can then use this report to distribute passwords the end-users.
Another option would be to predefine the passwords. Just add a new column to the CSV file that contains a password for each account, and update the code to assign that value to the -Password parameter during the provisioning process.
Share on: